Categories
Computing Hardware Science and Technology windows

Enabling Windows Core Isolation With Driver Incompatibilities

[tl;dr — if you’re reading this and just want the fix, click here. However, I’d recommend reading the short preamble — the reasons why Windows presents this error are interesting.]

The Backstory

You’ve seen it, if you’re reading this — the new option in your Windows Settings to enable “Core Isolation”:

A screenshot of the Windows Core Isolation/Memory Integrity option in Windows 10.

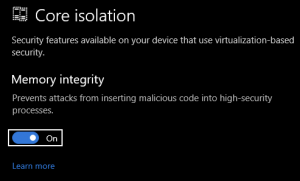
Basically, it separates the way windows processes run on your system so that they’re running in fully virtualized environments, utterly isolated from each other — neat, huh? This may be wrong, but I kind of think of it like a “containerization” for your normal windows processes.

Well, if you’re like me, when you tried to turn this on, your computer reported that it could not turn this on due to “driver incompatibilities”.

Example of the error windows shows you when you have incompatible drivers that are preventing Core Isolation from being enabled.

At this point… you may be stuck. Like I was, for weeks. This is a tough problem to get past. The error message that Windows presents at this point is not helpful, and the link to microsoft.com tells you little more than what the error message is already telling you… it’s frustrating.

You may be thinking to yourself, “Okay… so I’ve got drivers that are incompatible with this new feature. Um, turn them off? Don’t use them?”

I’m guessing Windows does not offer anymore help here because mucking around with drivers on Windows can lead to some major problems (for example, while trying to enable this feature, I rendered my entire Windows partition unbootable. Plus, booting into safe mode to try to fix it was impossible, because I have bitlocker turned on, and I lost my recovery key! Fun!).

So, at this point, Windows just leaves you high and dry. You may try to search the Internet for answers, but: be careful. There are several sites out there that offer “solutions” for this by offering a way you can download a registry key and force-enable this option (I won’t link to them here so their visibility in search engines won’t improve). Trust me; just don’t do this. Just don’t. This will possibly render your system unbootable, and depending on your situation, there is no way to revert it, short of a complete re-imaging/reinstallation. (I spent all day doing this one time because of this!)

Anyway — here’s what did work for me.

The Fix

  1. First things first — keep the Settings window showing the list of “incompatible” drivers open — you’ll need that in a moment.
  2. Second — download a copy of Microsoft’s SysInternals. If you’re not already using these for Windows system management, you just found one of your new favorite groups of utilities. Released by Microsoft, this is a suite of tools that are so essential, you’ll wonder why they’re not included in default Windows installations (I wonder about this every time I use them).
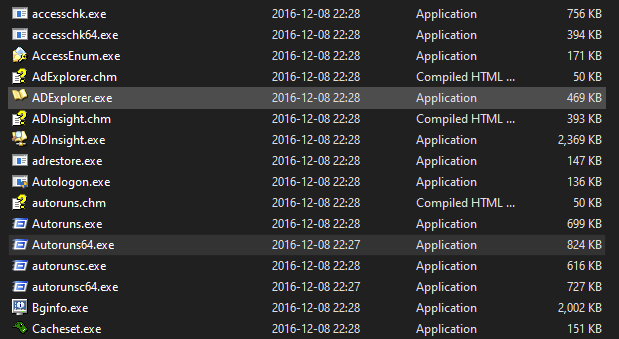
  1. In these tools, look for a tool called “Autoruns64.exe” — run it. (It goes without saying that everything here you need to do with Administrator privileges.)
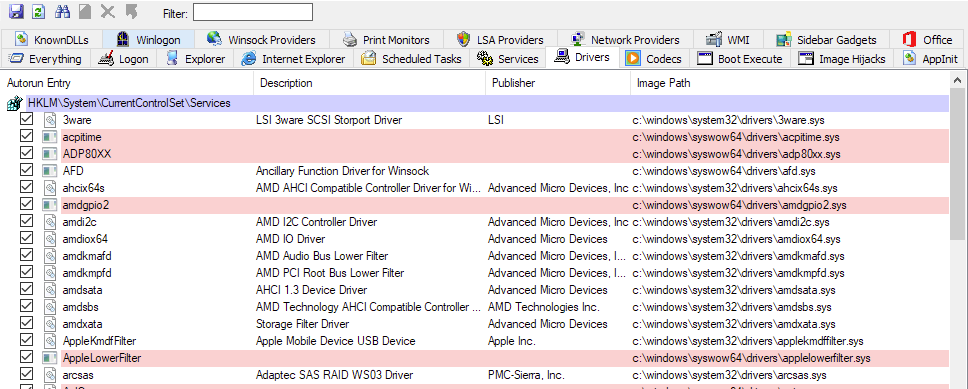
  2. You’ll be presented with a list of processes, drivers, etc, that run on Windows boot. Click on the tab for “Drivers”.
  3. Now, for each item in the list of “incompatible drivers” that Windows presented you, type part of its name into the “Filter” field, and de-select its checkbox (if you don’t find it in your list in Autoruns64.exe — skip it and we’ll apply a different fix in a moment):
Image showing AutoRuns64.exe interface
  1. Now, open a Powershell window, in Administrator mode. For each driver that you de-selected in Autoruns64.exe, just do “Remove-Item <path to driver>”.
  2. Restart, and try to enable core isolation again!

Fix for Drivers that Don’t Show Up in Autoruns64.exe

Okay — you’ve done the steps up above, and for some strange reason, you have an incompatible driver that’s not showing up in Autoruns64.exe (its “Published Name” probably starts with “oem”, doesn’t it?). The exact reason for this is something that still eludes me, but basically, it’s a very naughty driver that’s going to need a special trick to remove it.

For this, we’ll be using a tool called “pnputil” in Windows, which is just another one those utilities that’s included with Windows that you’ve never encountered before today (if you have, my condolences!).

For this type of driver (with a published name that, like I said, probably looks like “oem30.inf”), do the following command in a Powershell window running in Administrator mode:

pnputil -f -d oem30.inf 

(for example; change "oem30.inf" to whatever is the "published name" of the driver you're having trouble with)

In Conclusion

That should be it, and Core Isolation should work now. If it doesn’t, then you’ve encountered a weird issue that isn’t covered here — but don’t fret too much! If you’re kind of person to try to troubleshoot this issue this far, your Windows installation is already very secure, even without this feature.

Keep trying, and then, when you figure out your solution, make sure and write about it so it can help others!

Categories
Android Hacking Hardware Linux Science and Technology

How My Love Affair with Google Ended When I Decided to Stop Being their Unpaid Beta Tester

(This blog post was originally started back in 2016 when I decided to give up on Android for good. I never got around to posting it, even though it’s basically finished, and I still agree with it today! You can pretty much just replace any mention of “Nexus phones” in your head with “Pixel phones” and the argument still works.

With Google seemingly losing interest with Pixel phones in mid-2020, the post is just as relevant today as it was nearly five years ago.)

Logo for Android Version 4.4

The Passion of the Android

Spend a little while on any site that focuses on anything Android, whether it’s phones or apps, and you’ll quickly realize that the Nexus phones produced by Google are held in esteem above all others.

Their specs are lauded.  Their problems glossed over.  Their ability to “always have the latest OS version” (an ability iPhone owners take for granted) unlike phones you get directly from cell phone companies (think AT&T and Verizon), is held in the highest regard, especially.

To the visitors and commenters on these sites, the ability of a Nexus phone bought from Google, to have the newest version of Android before all other phones in the massive Android universe is more important than anything else, be it a sacrifice of 1) speed (because of the higher memory usage of newer software versions), 2) reliability (because of the presence of hidden bugs inherent in all new software), or 3) compatibility (because of app makers not always being able to get new versions of apps release in time to support new versions of Android, if something has broken the app).

All sorts of reasons are brought up for why this is best.  “The phone companies don’t want to upgrade the Android versions on their phones in a timely fashion because they’re lazy and don’t care.“  “The phone makers (also called OEM’s) don’t want to upgrade the Android versions on their phones in a timely fashion because they want you to buy a new phone.

Since version 2.3 of Android, the version of Android running on your phone has been far less important because of Google Play Services

While there are very important reasons that upgraded software on your phone is important (like security fixes, patches, etc), the insane concern for the version number on your phone always being the latest defies all understanding.  Since back in the Android 2.3 days, the Android team at Google even moved most of the important parts of Android (the fun parts that get updated) into a standalone app called “Google Play Services” a few years ago to combat the problem of OEM’s and cell phone companies not updating the Android versions of their phones.

If you have an Android phone, you can go into the full list of apps installed in your settings and see “Google Play Services” there — you can’t stop it from updating, and no one, including the cell phone companies and OEM’s, can stop it either.  This way, even older phones running older versions of Android can still have compatibility and quite a bit of neat new features that newer versions of Android get (like the Android Device Manager, Android’s answer to the iPhone’s “Find My Phone” feature).  The changes to this hidden service layer are subtle, well tested, and ensured to not cause any problems in the massive universe of different Android phone types.

Getting a fully new version of Android is less important in this way, but still offers some benefits here and there (like encryption being a default setting in Android 6.0).  Still, cell phone companies and OEM’s only release full new versions of Android for their phones after months, sometimes a year or more, of testing.  Why is this important?

Yo, do you even test, dude

When you’re a company like HTC (my favorite Android phone maker), or a cell phone company like Sprint, you live and die by your core product. If you work at HTC and your phones suck when it comes to reliability or user experience (or UX), you’re toast.  If you work at Sprint and your service is slow and the phones people buy from your stores don’t work (even though you don’t make them), people stop buying your phones and recommending your service to their friends.

The iPhone/iOS team at Apple does this behind the scenes for months with their products, both phones and operating systems.  Car companies do it for their car software.  Your microwave uses software that was tested for years to make sure the buttons always worked when you pressed them, and to ensure that it didn’t set your food on fire.

Why I bring this up is because I’m reasonably certain, after years of using Nexus phones, that the Nexus team at Google either doesn’t do this type of UX testing, or does it very, very little.

And why would they?

Google doesn’t make money selling phones.  It’s a B2B (business-to-business) company that makes 90% of its profits selling ad space to commercial entities (I went through the work of looking through its investor documents, found here (page 32): https://abc.xyz/investor/pdf/20160331_alphabet_10Q.pdf)  Everything else Google does is minor, and whatever minuscule amount of profit it makes from selling Nexus phones is an even smaller part of that.

Google doesn’t make money selling phones.  It’s a B2B (business-to-business) company that makes 90% of its profits selling ad space to commercial entities

…and there’s nothing wrong with that.  The employees of Google are very good at what they do.  They should focus on their core business, and put the bulk of their resources into effectively selling ads.


Categories
Computing Hardware Linux Ubuntu

GeekBench for Linux ARM?

Just got a Rasberry Pi and you’re wanting to benchmark it against other computers that you’ve benchmarked with GeekBench?

It’s not possible, for the most part — no release version of GeekBench for the ARM platform exists, but the creator of GeekBench did release a one-time build of GeekBench 2 a while back:

Source: GeekBench for Linux ARM? / Geekbench / Discussion Area – Primate Labs Support

Categories
Android Enterprise Computing Hardware Science and Technology

Unified Internal Storage for Android 6.0+

Thinking about using Unified Internal Storage on Android 6.0+ to expand your phone’s measly internal storage?  Don’t even think about using it with anything other than a UHS-II SD card — even if your phone will let you use a slower card, don’t do it — your performance will be terrible.

It seems like it has to be UHS-II, for some reason (maybe it’s random r/w speeds?). I tried with even a very, very fast UHS-I, that benchmarked nearly the same, but Android wasn’t satisfied with it, giving the “This SD card is slow” warning.

The best priced one I could find out there (that you’d want to use) was a 32GB one:

https://www.bhphotovideo.com/c/product/1211505-REG

Categories
Android Hacking Hardware

Creating a QI Wireless-charging Case for the Moto X (or any phone, really)

The Moto X (2013) is one of the best Android phones there is — it’s thin, it’s light, and the battery lasts nearly two days.  It’s got passive, voice-activated features that you can use even when the phone is locked and in your pocket.  You can launch your camera just by flicking your wrist in a certain way.  It’s got a lot of great features… but (eventhough there’s actually space inside the phone for it) QI-compatible wireless-charging was left off that list.

There are mods out there to take apart the Moto X and install a QI charging bad, but it renders you unable to charge your phone via a conventional cable when necessary, so I didn’t want to take that route.  Even if I have access to wireless charging pads at home, there’s going to be a situation where I’m going to need to charge my phone away from home, and modifying your phone in that way would prevent that (without disassembly).

When looking for wireless-charging compatible cases for my MotoX, the pickings were slim — I found one that was compatible with Duracell’s (proprietary, and not very well supported) Powermat technology, however, I’m wanting to take advantage of the huge mount of QI-compatible wireless-charging devices already out there.  QI is a technology that’s already been used by Nokia and Google for years now, and it’s licensed much more easily than Duracell’s technology.

So, I set about making my own QI-compatible wireless-charging case, using parts you can buy easily on Amazon.

#1) Buy your parts

Moto X and QI wireless charging pad, side by sideImportant: Get a QI-compatible charging receiver with the USB plug that faces up.  The case doesn’t matter, as long as it’s one that leaves enough room between the phone and the case so that there’s room for the charging pad.

#2) Test fit your charging pad in the case

Charing pad just sitting in case.

Try placing the charging pad in the case, and plugging the connector into your phone (at the bottom).  The case will “pinch” the connector cable a little — this is okay.  It’s durable, and very thin.

When you’ve figured out where the pad will sit when sandwiched between your phone and the case when it’s plugged in, move to step #3.

#3) Glue your case (or attach with tape)

Glue on four corners of charging pad

When you’re ready, put four drops of glue and place the pad into its final resting position that you decided upon in Step #2 (or just place it there and put four pieces of clear tape over the corners — this is what I had to do eventually when the glue wouldn’t hold).

#4) Seat everything together

Phone with case on with charging pad installed.

When your glue has dried (or your tape has been placed), carefully insert the QI charging pad cable into your phone’s USB port, and place your phone into the case.  Everything should sit together nicely, which just the little extrusion for the USB plug.

#5) Charge on a QI-compatible charger

Moto X with QI charging case on wireless charging pad.

When I placed my phone on the Anker charging pad, it started charging right away!  The phone even reflected so on the battery icon — I had heard from similar tutorials that sometimes this was not the case.  The phone would be charging, but the icon on the home screen would not show it.

I think this is due to whatever combination of charging pad and QI insert these individuals were using was not sufficient enough for the phone to reflect it, even though an actual current was being delivered to the phone.  I have experienced this in the past with Android tablets, if you’re using a charger that didn’t come with the tablet — the tablet would charge, even if the tablet’s UI didn’t reflect it.  It would charge very, very slowly.

So, good luck, and happy charging!

Categories
Hardware Linux Science and Technology Ubuntu

HP Pavilion Touchpad Not Working (you need to “kick” it)

So, for about two days the touchpad on my HP laptop stopped working.  Of course it was right after a kernel update in Ubuntu, so I immediately blame that.  You know… because 9/10 times it is.

So, I’m checking and checking things but can’t find anything.  It’s weird.  It’s not like it’s not working correctly, or is misconfigured — it’s like Ubuntu, which is actually pretty good at picking up on hardware changes today, can’t even see it.  So on a hunch I reboot into Windows, but it’s not working there either.

So now, instead of having to tromp through the utterly useless Ubuntu forums (full of unresolved issues where people complain about some update or the other breaking something), I can now expand my search to various HP Windows forums. Where in about five minutes, I found this gem.

Apparently, on some HP laptops (or maybe all laptop hardware is set up like this, I’d honestly never encountered it before), you have to perform what’s called a “kick”:

  1. Turn off your laptop.
  2. Unplug your AC adapter.
  3. Take out your battery. (If you can’t take out your battery externally, time to pull out a screwdriver and start taking your laptop apart.)
  4. Hold down the power button on your laptop for at least 30 seconds, preferably more (just to make sure, since time is a relative construct perceived differently by all sentient forms of matter).
  5. Put in your battery, and turn back on.  Your touchpad should now be visible to your OS, be it Ubuntu or Windows, again.

Why or how this works is anyone’s guess.  I think it resets the BIOS (it seemed to do a strange double boot the first time plugging it in after performing this procedure, which is similar to what happens on a BIOS upgrade).  I’m just glad it does.

Categories
Hardware Linux

Fun stuff about home server management you don’t learn until you’re already knee-deep in problems

  • The hardware-based “Raid 1” hard drive mirroring (for safe data “insurance”) that’s built into most motherboards today isn’t real Raid 1 — it’s a type of “fake” Raid 1 that’s really just a fancy software wrapper: https://help.ubuntu.com/community/FakeRaidHowto
  • It’s actually really, really easy to control what hard drives are mounted (and to what directories) on Ubuntu by editing the /etc/fstab file.  Yeah, that’s about it.  No fancy programs you have to run or weird modules/packages to install.  No need to search through Google for hours thinking that “there’s got to be something more to it than that.”


Categories
Hardware Science and Technology

Single-user mode, MacOSX 10.8

image

It’s how one tests for issues without the rest of the OS getting in the way. Just boot your Mac while holding Command+S.